Stuffed Turkey Breast (and Turkey Subs)

Serves: 4 -8 per breast, depending on breast size

Christmas was always a pretty big deal in my family, something consistent with most families I guess.

My mother being an excellent – and calm – cook, would prepare the same amazing turkey lunch each year, remit with the world’s best stuffing, smooth, buttery mash, peas, gravy, ham and plenty of cranberry sauce. You left the table stuffed and poorly on your feet.

But the best part of this lunch wasn’t the lunch.

It was dinner.

Because after a few hours of playing with your toys and snoozing, it was time for turkey subs, an American invention my father would take control off.

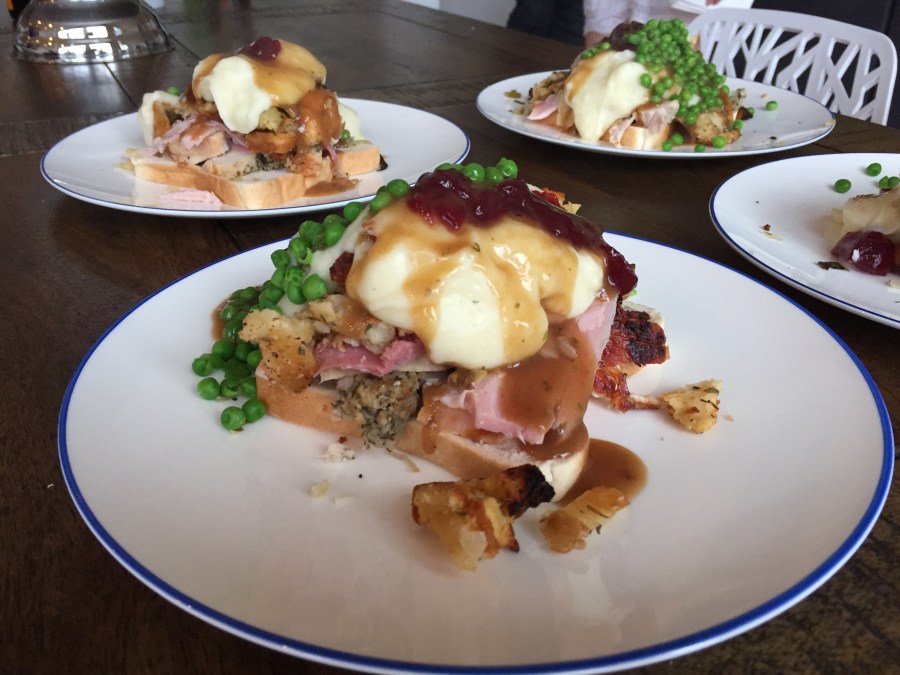
Whoever invented turkey subs was a genius, because it is Christmas lunch all over again, except this time, served in a pile on a piece of bread. Think of it like Christmas Lunch Express™ but at dinner time.

And so with all this background, we arrive at this recipe.

For the past 10 years, I have done this Martha Stewart stuffed turkey breast rather than a whole turkey. A variety of reasons for this including that the breast is easier to cook and the breast really is what everyone wants right?

It also travels better than a whole cooked bird, is easier to slice the next day into sandwiches or a salad and well… it’s just easier and nobody complains or that I am aware of.

You could well add some chilli flakes to this dish, maybe some fennel seeds. The flavour by no means overwhelms and is just a subtle background flavour.

Turkey subs

Turkey subs simply make Christmas for me. They are your pat on the back that all your preparation and cooking and effort has been worth it and you can sit back with a vino and toast the end of the year.

To make the sub, start with a slice of bread for each person and then layer:

Ingredients

1kg turkey breast
Coarse Salt and Pepper
6 tablespoons unsalted butter, room temperature

Sausage and Sour Cherry Stuffing

2 cups bread cubes from load of rustic
2 tbs olive oil
1 small red onion, peeled and very thinly sliced (about ¾ cup)
2 small garlic cloves, finely chopped
Coarse salt and pepper
200g sweet Italian sausage, casings removed
1/3 cup coarsely chopped dried sour cherries
1 tsp finely chopped fresh rosemary
1/3 cup chicken stock
3 tbsp coarsely chopped fresh flat leaf parsley

For the Sausage and Sour Cherry Stuffing

  1. Toast the bread in a toaster or grill until golden. Allow to cool.
  2. Make the stuffing: Set a large frypan over medium-high heat until hot, then heat the oil.
  3. Add onion and garlic, and season with salt and pepper. Cook, stirring occasionally, until onion is translucent, about 3 minutes. Add sausage and cook, breaking it up with the back of a spoon, until cooked through, about 3 minutes. Stir in cherries and rosemary, and cook 1 minute more.
  4. Pour in stock and stir to combine, then stir in bread, making sure all parts are moistened with liquid. Remove from heat and stir in parsley. Adjust seasoning as desired.

For the stuffed turkey breast

  1. Heat oven to 200c.
  2. To butterfly the turkey, use a slicing knife and your fingers to remove skin from breast, reserving skin. Turn the breast over (so the side that had the skin is facing down), and lay it flat on the cutting board. Holding the blade of the knife parallel to the board, about halfway down, slice into the thickest portion of the breast. Cut along the length of the breast, but not all the way through. Unfold so the turkey opens like a book. Remove the tough piece of cartilage. Cover with a piece of plastic wrap and pound with a meat mallet until the turkey is of uniform thickness (about 1/2 inch). Season with salt and pepper.
  3. Spread stuffing evenly (about 2cm thick) over turkey, leaving a 3cm border. Starting with one short end, roll into a log, completely enclosing the stuffing, and wrap the reserved skin around the breast, over the seam. Season all over with salt and pepper. Roll in a piece of cheesecloth, and secure both ends with kitchen twine; if you don’t have a cheesecloth, use twine all over as I do. Rub butter evenly all over cloth.
  4. Roast on a rimmed baking sheet until an instant-read thermometer inserted in the middle registers 70 degrees, 40 to 50 minutes. Let rest for 10 minutes (the internal temperature should rise to 75 degrees).
  5. Remove cheesecloth and twine, then place turkey on a cutting board and slice crosswise about 2cm thick.

Muffuletta

Serves 6 – 8

I saw this incredible Italian sandwich being made by the always talented Giada De Laurentiis on her TV show a few years ago.

I prepared it for a date night with Nat – moonlight cinema – and prior, there was quite a bit of running around; for focaccia, once the hero bread of every café and sandwich, has largely disappeared from pretty much everywhere in Sydney.

I must have gone to half a dozen stores in Leichardt, all of whom said that they sold out early, every morning, mainly to nonnas who came in at dawn.

Given that each bite of this sandwich is like eating an antipasti platter, perhaps the elimination of the oily focaccia was a good thing, though I reckon it would have rounded out what is otherwise an extraordinary sandwich, if not one that is slightly daunting.

The traditional round bread I used was great however, though pull back a bit on the oil. After a night in the fridge compacting, you want to ensure that the bread doesn’t disintegrate as you try to work out how on earth you are going to get on a bite on your muffuletta.

This is your next adult picnic sorted.

Ingredients

¼ cup red wine vinegar
2 garlic cloves, peeled and minced
1 tsp dried oregano
1/3 cup olive oil
10 large pitted green olives, chopped
1/3 cup pitted, chopped kalamata olives
¼ cup chopped roasted red bell peppers
Salt and freshly ground black pepper
1 (500gm) round bread loaf (about 18cm in diameter and 8cm high)
125gm thinly sliced ham
125gm thinly sliced mortadella
125gm thinly sliced salami
125gm sliced provolone
½ red onion, thinly sliced
Handful of rocket leaves

Method

  1. Whisk together the red wine vinegar, garlic and oregano together and then gradually blend in the oil. Stir in the olives and roasted peppers. Season the vinaigrette, to taste, with salt and pepper.
  2. Cut the top 2.5cm of the bread loaf. Set the top aside. Hollow out the bottom and top halves of the bread. Spread some of the olive and roasted pepper mix over the bread bottom and cut side of the bread top. Layer the meats and cheeses in the bread bottom. Top with the onions, then the rocket. Spread the remaining olive and roasted pepper mix on top of the sandwich and carefully cover with the bread top.
  3. You can serve the sandwich immediately or you can wrap the entire sandwich tightly in plastic wrap and place in the refrigerator a day before serving; if you can, place something on top of the muffuletta to weigh it down and further compact the ingredients.
  4. Cut the sandwich into wedges and serve.
  5. Go for a long run.

Dry Sri Lankan Chicken Curry

IMG_7322.JPG
One of the best curries we have cooked.

Serves: 6 – 8

When you stumble onto a curry as good as this, it is like hitting a home run.

Because whilst I type of plenty of really good and often fantastic recipes, outstanding recipes are much rarer. And this is one of them.

It didn’t start life as a dry curry – and of course by dry, it simply means without lots of gravy – though that is pretty much the genius of the whole thing.

Whereas the original recipe asked for 40 minutes of slow simmering, we had it on for at least three hours.  Closer to four I think.

And whereas the original asked for coconut cream and two slices of lemon rind right at the end, we skipped this. And thank god we did.

After such a long cooking time, the chicken is literally falling apart. The texture, the flavor is so warm and deep, it is impossible not to grin. You realise you have struck gold.

But the next morning on some soy-linseed toast?

You really will thank me later on this one.

Ingredients

1.5kg skinless chicken thighs, cut into 2cm pieces
10 curry leaves
2 onions
2 tsp garlic, crushed
2 tsp fresh ginger, grated
2 tbsp canola oil
1 tsp chilli powder
1 tsp ground cumin
1 tsp ground turmeric
1 tbsp ground coriander
2 tsp paprika
½ tsp salt
2 tbsp white vinegar
2 tomatoes, diced
6 cardamom pods, bruised and cracked open
1 cinnamon stick
2 slices lemon rind
½ c coconut milk

Method

  1. Make a sachet d’épices (a cheesecloth tied with cooking string) holding the cardamom pods and cinnamon stick; you don’t have to do this step of course, though the joy of this dish is only enhanced by the smooth sailing eating it without removing cardamom pieces as you go.
  2. Heat the oil in a large saucepan, medium heat and fry the curry leaves until they start to turn colour. Add onions, ginger and garlic and cook until soft. Add all the spices (though not the sachet d’épices (whole spices), salt, and vinegar and stir well.
  3. Add the chicken and stir to coat meat. Add the sachet d’épices (whole spices) and the tomatoes, stir and cover.
  4. Simmer on a low heat, stirring occasionally. Do not be tempted to add any water as the juices will make more than enough. Cook for two to four hours or under the sauce has really reduced and the chicken is falling apart, ensuring that the curry does not become too dry and burn.
  5. Serve with rice and then toast the next morning.

Marinated Korean-style barbequed beef with miso slaw

Serves: 6

Another fabulous Bill Granger recipe and so easy. And healthy!

Another weeknight dinner locked in.

It is from his book Everyday Asian and thus far, not only are the dishes simple enough to be done every day, you’ll want them every day.

A few hours of marinating and the steak is so tender and ready for that sort of hot grill BBQing that makes this sort of marinade sing. Luscious.

The slaw is great too – really great – and pairs well with the steak.

It isn’t Rockpool (RIP 2016) though it is easily achievable, fun to make and nobody will complain.

Because if they do…

According to Bill, the kiwifruit is to help tenderise the meat. I guess so: I think it is a bit of a wank though you enjoy cooking and it is a bit out of the ordinary right? Plus people will know you’re a Masterchef inserting such unusual ingredients!

Ingredients

Beef

½ ripe kiwifruit, peeled and mashed
3 tbsp soy sauce
1 tsp sesame oil
2 garlic cloves, chopped
2 tbsp brown sugar
1 tbsp rice vinegar
3 steaks, 2.5cm thick (about 800gm) (We used scotch, though maybe rump?)
Chinese chilli relish (we used hot sauce)

Miso slaw

200gm white cabbage, shredded
200gm red cabbage, shredded
4 celery sticks, cut into batons
1 red onion, thinly sliced
(Or of course, being the middle of the week, use a bag of raw slaw mix from the supermarket)
1 tbsp rice vinegar
1 tbsp caster sugar
1 tbsp lemon juice
1 tbsp white miso paste

Method

Beef

  1. Put the kiwifruit, soy sauce, sesame oil, garlic, sugar and vinegar in a small bowl and combine. Place the mixture with the steaks in a ziplock bag and massage the marinade into the steaks. Set aside and marinate in the fridge for 3 hours or more.
  2. Heat the grill to high. Shake the marinade off the steaks and grill for 3 minutes each side.
  3. Rest and then slice on the diagonal.
  4. Serve with the miso slaw and Chinese chilli relish (or hot sauce).

Miso slaw

  1. Place the cabbage, celery and onion in a large bowl.
  2. Combine the vinegar, sugar, lemon juice and miso paste and whisk until the sugar has dissolved.
  3. Pour over the vegetables, stir to combine and serve with the beef.

Asian Chicken & Mushroom Croquettes with Baby Cos

Serves: 4

Wow, this is an absolute weekday cracker.

And it is Bill Granger. A man I have doubted but am now totally buying into!

I suspect that our addition of the chilli flakes was a necessary addition – and don’t hold back on the hot sauce if you like it hot – though the rest could not be doubted. Great flavor, moist and so easy to prepare.

And healthy. Seriously healthy.

Wow.

Bill, you won me over with this one. The doubt is gone – your simple cooking is a real winner!

(Double this recipe as we did; you will have the best lunch at work the next day! He claims it served 4 though it is so good and so healthy, just keep going.)

Ingredients

4 tbsp canola oil
250gm button mushrooms, stalks removed, finely chopped (or food processed as we did)
2 garlic cloves, finely chopped
500gm chicken mince
1 tsp finely chopped fresh ginger (do 1 tbsp and you won’t look back)
1 tbsp light soy sauce
1 tsp sesame oil
1 tbsp chilli flakes
½ tsp freshly ground black pepper
1 or 2 heads of cos lettuce, leaves separated
1 small red onion, sliced into thin rings
Small handful of coriander leaves
Hot sauce

Method

  1. Heat a large frypan over a medium-low heat, add 1 tbsp of the oil and cook the mushrooms and garlic until nearly all the moisture has evaporated; remove the mushroom mixture from the pan and cool.
  2. Combine the mince, ginger, soy sauce, sesame oil, pepper, chilli flakes and mushroom mixture and mix well. Use 2 tbsp of the mixture at a time to role the small, football-shaped croquettes.
  3. Heat the remaining oil in the frying pan over a medium-high heat. Add the croquettes, turning occasionally for 5 – 7 minutes or until golden all over and cooked through.
  4. Serve the chicken in the lettuce leaves with a few onion rings, a small handful of coriander and a good squeeze of hot sauce.
  5. Thank me later!

Osso Buco Alla Milanese

Serves: 4

Osso Buco is typically associated with a robust tomato sauce, though that is not how it is traditionally done. Osso Buco is in fact a Northern Italian dish and tomatoes do not feature nearly as prominently as they do in the South.

This dish is served with gremolata and is much more delicate than the tomato variety. I love gremolata and this dish is clean and fun, especially without the tomatoes.

Serve with some sautéd brussel sprouts and some Parmesan mash and you’re onto a winner.

Ingredients

12 pieces of veal shank
Plain flour, seasoned with salt and pepper
¼ cup olive oil
60g butter
1 garlic clove, finely chopped
1 lemon, zest peeled, finely chopped
Good handful of parsley, finely chopped
250ml white wine
1 bay leaf
Pinch of allspice
Pinch of ground cinnamon
Thin lemon wedges to serve

Gremolata

2 tsp grated lemon zest
6 tablespoons finely chopped parsley
1 garlic clove, finely chopped

Method

  1. Dust the veal with the seasoned flour.
  2. Heat the oil, butter and garlic in a large heavy saucepan big enough to hold the shanks in a single layer. Put the shanks in the pan and cook for 12 to 15 minutes until well browned.
  3. Arrange the shanks, standing them up in a single layer, pour in the wine and add the bay leaf, allspice and cinnamon. Cover the saucepan.
  4. Cook at a low simmer for 15 minutes and then add ½ cup of water. Continue cooking for between 45 mins and 1 hour, until the meat is tender. Check the volume of the water from time to time and add water if needed.
  5. Transfer the veal to a plate and keep warm. Discard the garlic clove and bay leaf.
  6. To make the gremolata, mix together the lemon zest, parsley and garlic.
  7. Increase the heat under the saucepan and stir for 1-2 mins until the sauce is thick, scraping up any bits off the bottom of the saucepan. Stir in the gemolata and season, and return the veal to the sauce.
  8. Heat through and then serve with lemon wedges.

Onion Rings

Serves: 4

My first memory of onion rings was at a restaurant (chain) in Neutral Bay, Tony Romas.

Yes, the world famous Tony Romas had two outlets in Sydney before they shut at the Big Bear in Neutral Bay 20 years ago and then again in the city, around ten years ago.

Institiution lost!

My parents took us probably a dozen times, primarily for the onion rings and ribs, though just as equally because it was one of those restaurants that encouraged kids to draw on their paper placemat. It was a win-win for parents and kids alike.

When I was around 14, my mother bought a portable deep fryer and I remember cooking onion rings for several Sunday-evenings in a row, just before returning to boarding school for the week.

Served with steak, ribs, fried chicken, pork or whatever, these rings are magic and unquestionably worth the effort. Just make sure you go slow when dropping the onion rings into the boiling oil.

I learned that lesson the hard way.

P.S. When Nat and I were in Hawaii last year, we ate twice at Tony Romas and unless you are mad, you should make the trek as well. It is the best!

Ingredients

8 onions, thinly sliced into rings (I’d allow 2 for each person or more!)
Milk to cover
4 egg yolks
Flour
Sunflower oil

Method

  1. Soak the onions in the milk for at least 20 minutes.
  2. Add the yolk to the onions/milk, stir to combine and discard all liquid.
  3. Toss onion in flour to coat, shaking off excess.
  4. Heat oil in deep fryer, large, heavy saucepan or wok to 190c. This temperature should turn a cube of bread golden in 30 seconds.
  5. Fry the onions in batches; this should take a minute or two up to 3 minutes depending on how you like them.

Not as good as Ellen’s Grilled Chicken Caesar Salad

Serves 4

Nothing beats my mother’s Caesar Salad recipe though pretending you had eaten it for 10-days straight – which I believe you could – then this is not a bad alternative for a day.

I adapted it by adding the poached egg and seriously, why shouldn’t you?!

Stop worrying about Caesar Salad being so bad for you and focus on the positives: life is short and so eat well.

Ingredients

650gm chicken breast (skinless)
8 slices prosciutto
Quarter to a third of a baguette, cut into largish croutons
4 eggs
Olive oil
2 garlic cloves, smashed
3 tbsp lemon juice
2 tsp Dijon mustard
1 tsp anchovy paste (chopped anchovies)
2 baby cos lettuce (the recipe asked for Romaine which would be better)
½ cup grated Parmigiano-Reggiano (or Parmesan)
Pepper and Salt

Method

  1. Blend garlic, lemon juice, mustard, anchovy paste, pepper and salt in a blender until combined. With motor running, add 7 tbsp of olive oil in a slow stream, blending until emulsified.
  2. Heat a large pan with oil over a medium-low heat, add enough olive oil to barely cover the pan and cook the croutons until lightly golden: the croutons should have absorbed the oil, and oil should be added if too dry.
  3. Poach the eggs, drain and reserve.
  4. Heat a large pan over a medium-low heat, and cook the prosciutto until slightly crispy. Tear.
  5. Pat the chicken dry and coat with 1 tbsp oil, and season. Heat lightly oiled grill pan (or BBQ grill) medium high and grill the chicken. Cut into ½ inch slices and let cool slightly.
  6. Toss the chicken with two tbps of the dressing in a large bowl.
  7. Add the lettuce, cheese, remaining dressing, croutons, prosciutto and toss. Serve in bowls, placing an egg over the top of each.

Pad si-iew prawns

Serves: 4

We are currently on a wonderful holiday in Koh Samui.

As you would expect, pretty much everything is planned around and hinged on food; and a few stops into a local tailor who is expertly – and inexpensively – working me up two suits.

We had one of the best pizzas either of us had ever had at a place near Bophut called Dr Frogs: the thinnest Rome-style pizza ever, one with parma ham and mozzarella, the other with this incredible beef sauce, mozzarella, rosemary and parmesan called ‘Dr Frogs Evolution’.

We had a really memorable – and Italian again – meal at a place called Pepenero, where the chef added me to Facebook after the three of us swapped stories of pasta, cooking, wine and the good life. The guy was a genius and you really should try if you are ever in this part of Thailand: his pasta and love for the good life are just awesome.

In fact, whether it has been grungy Thai or an exquisite Beef Wellington (old school, right!) at The Larder, the food has been amazing.

The highlight however was today when we did a cooking school with Smiley Chef, a warm, simple and really authentic collection of cooks who start at the markets, cook in an outdoor kitchen and finish with plates of hot, spicy, beautiful Thai food.

Yum!

We did four dishes; the four of us – Nat, myself and two ladies from Hong Kong and Vancouver respectively – chose a dish each and Pas si-iew being Nat’s go-to Thai noodle dish was her choice. She is no fool!

It was a classic, classic interpretation.

The fear when ordering from a new Thai restaurant in Sydney (and really anywhere) is how they will do – or not so well do – the Pad Thai and Pad si-iew. Stick to this recipe and you will have the most down-the-line, no questions asked version you could want.

This will definitely become one of our future staples.

(I have adapted the recipe to suit four people… just make sure you serve it hot!)

Ingredients

Sunflower oil
4 good handfuls of Pad si-iew noodle, fresh
8 stems of Chinese kale, cut into 4 cm pieces
8 baby corn, quartered
12 slices – thin – of carrot
8 clove garlic, chopped
4 eggs, beaten
12 prawns, peeled
Chilli flakes
White pepper
Lime slices

Seasoning

4 tbsp Oyster sauce
2 tbsp Soy sauce
2 tbsp Black Soy sauce
2 tbsp Light Soy sauce
2 tbsp Fish sauce
2 tbsp sugar (palm or coconut sugar if you have it)

Method

  1. In a wok or frypan, heat two tbsp sunflower oil over a medium-high heat and fry the garlic for a minute or two. Add the chicken and when the chicken is cooked, add the egg, scrambling until cooked.
  2. Add the noodle, seasoning and the vegetables and stir fry over a high-heat for 1-2 minutes until the vegetables are cooked through.
  3. Serve on a plate with fresh lime, chilli flakes and a sprinkling of white pepper.

Patricia Wells’ Fresh Roasted Salmon with Olive Oil (Escalope de Saumon Frais Roti a l’Huile d’Olive)

Serves: 4

What a simple, fabulous French dish. And so old school as well!

It is from Bistro Cooking by Patricia Wells, a book I am dying to cook more and more from.

Just read the ingredients, put a bottle of French white on ice and slice the bread. This is a late Sunday lunch and snooze wrapped up.

Ingredients

2 tbsp extra virgin olive oil
2 shallots, finely minced
4 medium tomatoes (peeled, cored, seeded and chopped)
½ c crème fraiche
4 salmon fillets, with skin attached
Salt
1 large bunch of fresh basil, minced

Method

  1. Preheat the oven to 165c.
  2. Heat 1 tbsp of oil in a skillet or solid saucepan. When the oil is hot, though not smoking, add the eschallots and sauté until soft, but not browned; around 2 – 3 minutes. Add the tomatoes and continue cooking until much of the liquid has cooked away; about 10 minutes. Reduce the heat to low and add the crème fraiche. Cook just long enough to heat the cream, and set aside.
  3. Brush the salmon and skin with the remaining oil. Heat an oven-proof pan over a medium-high heat. (The best way to achieve a crispy skin is to use a copper or metal bottomed pan, ensuring the fish is sufficiently oiled, and pressing the skin into the heat for 20 seconds.)
  4. Adding no oil, cook the salmon, skin down for 2 minutes. Season with salt. Turn the salmon over and cook for 2 more minutes, seasoning with salt again.
  5. Transfer the pan to the oven and bake for 5 minutes or until opaque.
  6. To serve, stir the basil into the sauce. Spoon several tablespoons of sauce in the middle of the plate and place the salmon on top of the sauce. A crack of pepper and serve with crusty bread.